
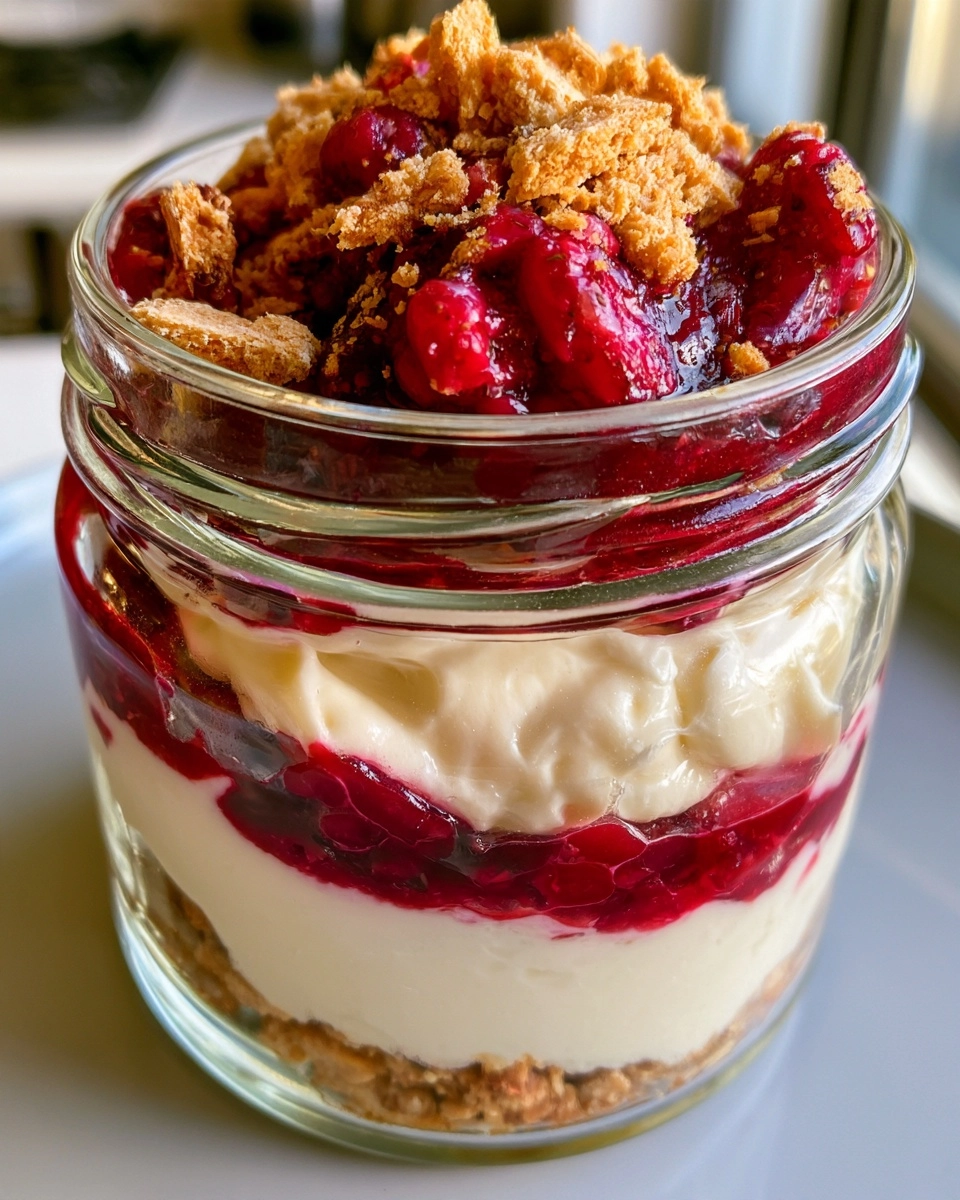
No Bake Greek Yogurt Cheesecake Jars
Are you looking for a quick and delightful dessert that will impress your family and friends? Look no further than these No Bake Greek Yogurt Cheesecake Jars! This easy-to-make treat combines creamy Greek yogurt and rich cream cheese, creating a luscious dessert that’s perfect for any occasion. Whether it’s a summer barbecue, a holiday gathering, or just a sweet ending to a busy weeknight dinner, these jars are sure to please. With a light, refreshing flavor and a smooth texture, they’re a breeze to whip up, making them a fantastic choice for busy moms and professionals alike!
Why You’ll Love This No Bake Greek Yogurt Cheesecake Jars
These No Bake Greek Yogurt Cheesecake Jars are a game-changer for anyone looking for a simple yet delicious dessert. They’re easy to make, requiring just a few ingredients and minimal effort. The creamy, tangy flavor is a hit with both kids and adults, making them perfect for family gatherings. Plus, you can prepare them ahead of time, freeing up your schedule for more important things—like enjoying time with loved ones!
Easy to Make
With just a few simple steps, you can whip these jars together in no time. No baking required means less mess and more fun!
Delicious Flavor
The combination of Greek yogurt and cream cheese creates a rich, creamy texture with a delightful tang that’s simply irresistible.
Family-Friendly
Kids love the fun presentation, and adults appreciate the lighter twist on traditional cheesecake. It’s a dessert everyone can enjoy!
Make-Ahead Friendly
These jars can be made a day in advance, making them a perfect solution for busy weeknights or last-minute gatherings.
Ingredients for No Bake Greek Yogurt Cheesecake Jars
Main Ingredients
- Greek yogurt: This creamy base adds a tangy flavor and a healthy twist.
- Cream cheese: Provides richness and a smooth texture, balancing the yogurt.
- Honey or maple syrup: Natural sweeteners that enhance the dessert’s flavor.
- Vanilla extract: Adds a warm, aromatic note that complements the other ingredients.
- Graham cracker crumbs: These create a crunchy layer that contrasts beautifully with the creamy filling.
- Melted butter: Binds the graham cracker crumbs together for a delicious crust.
- Fresh fruit: Optional topping that adds color, flavor, and a nutritious boost.
Optional Add-Ins
- Chocolate chips: For a sweet, indulgent twist.
- Nuts: Chopped almonds or walnuts can add a delightful crunch.
- Fruit preserves: A layer of your favorite jam can enhance the flavor.
- Spices: A pinch of cinnamon or nutmeg can elevate the taste.
Ingredient Notes
- For a gluten-free version, opt for gluten-free graham crackers.
- Feel free to use low-fat or fat-free cream cheese for a lighter option.
- Fresh fruit is best for topping, but frozen fruit can work if thawed and drained.
- Brands like Fage or Chobani are great for Greek yogurt, offering a thick and creamy texture.
Kitchen Equipment
- Mixing bowls: Use any size you have on hand; a large bowl is ideal for mixing.
- Measuring cups and spoons: Essential for accurate ingredient measurements.
- Whisk or electric mixer: A whisk works well, but an electric mixer saves time.
- Jars or cups: Any small containers will do for serving.
How to Make No Bake Greek Yogurt Cheesecake Jars
Step 1: Prepare the Ingredients
Start by gathering all your ingredients. Make sure the cream cheese is softened; this will help it blend smoothly with the Greek yogurt. If you’re using fresh fruit for topping, wash and slice it now. Having everything ready will make the process much easier and quicker!
Step 2: Mix or Assemble
In a large mixing bowl, combine the Greek yogurt, softened cream cheese, honey or maple syrup, and vanilla extract. Use a whisk or an electric mixer to blend everything until it’s smooth and creamy. You want a nice, even texture without any lumps. This mixture is the star of your cheesecake jars!
Step 3: Layer the Ingredients
Now it’s time to assemble your jars! Start by mixing the graham cracker crumbs with the melted butter in a separate bowl. This will create a crumbly crust. In your jars or cups, add a layer of the graham cracker mixture, followed by a layer of the yogurt mixture. Repeat these layers until the jars are filled, finishing with the yogurt layer on top. This creates a beautiful presentation!
Step 4: Chill the Jars
Once your jars are assembled, cover them with lids or plastic wrap. Place them in the refrigerator for at least 2 hours. This chilling time allows the flavors to meld together and the cheesecake to set. If you can wait longer, even better! Overnight chilling will enhance the taste.
Step 5: Serve and Enjoy
When you’re ready to serve, take the jars out of the fridge. If you’d like, top them with fresh fruit or any other toppings you prefer. Grab a spoon and dig in! These No Bake Greek Yogurt Cheesecake Jars are not only delicious but also a fun and elegant dessert that everyone will love.
Expert Tips for Success
- Use Fresh Ingredients: Fresh Greek yogurt and cream cheese make a noticeable difference in flavor and texture.
- Don’t Overmix: Mix just until smooth to avoid a dense texture; a few lumps are okay!
- Measure Accurately: Use measuring cups and spoons for precise ingredient amounts, ensuring the best results.
- Chill for Best Results: Allow the jars to chill for at least 2 hours to set properly and enhance flavors.
- Common Pro Tips: Experiment with different toppings and flavors to make each batch unique!
Recipe Variations for No Bake Greek Yogurt Cheesecake Jars
Healthier Version
- Substitute Greek yogurt with low-fat or non-fat options to reduce calories.
- Use stevia or monk fruit sweetener instead of honey or maple syrup for a sugar-free alternative.
- Add chia seeds or flaxseeds for extra fiber and nutrients.
Vegetarian Version
- This recipe is already vegetarian-friendly, but ensure that the cream cheese is made without animal rennet.
- Consider using plant-based cream cheese for a vegan twist.
Gluten-Free Version
- Use gluten-free graham crackers or crushed nuts as a base for the crust.
- Ensure all other ingredients are certified gluten-free, especially any sweeteners or toppings.
Spicy Version
- Add a pinch of cayenne pepper or cinnamon to the yogurt mixture for a surprising kick.
- Top with spiced fruit, like candied ginger or spiced apples, for an exciting flavor contrast.
Extra Indulgent Version
- Incorporate chocolate chips or chunks into the yogurt mixture for a rich chocolate flavor.
- Drizzle melted chocolate or caramel sauce on top before serving for a decadent finish.
- Use a layer of whipped cream on top for an extra creamy texture.
What to Serve With No Bake Greek Yogurt Cheesecake Jars
Side Dishes
- Fresh fruit salad for a refreshing contrast.
- Lightly dressed greens to balance the sweetness.
Sauces and Toppings
- Berry compote for a fruity burst.
- Chocolate or caramel sauce for an indulgent touch.
Drinks
- Iced tea or lemonade for a refreshing pairing.
- Light white wine or sparkling water for a festive feel.
Desserts
- Mini fruit tarts for a delightful variety.
- Chocolate mousse for a rich, creamy option.
Storage Instructions
Refrigerator
- Store the No Bake Greek Yogurt Cheesecake Jars in the refrigerator for up to 3 days.
- Keep them covered with lids or plastic wrap to maintain freshness and prevent odors from other foods.
Freezer
- These jars can be frozen for up to 2 months if you want to make them ahead of time.
- Make sure to use freezer-safe jars and leave some space at the top for expansion.
- Thaw in the refrigerator overnight before serving.
Reheating
- There’s no need to reheat these jars, as they are best served chilled.
- If you prefer a slightly softer texture, let them sit at room temperature for about 15 minutes before serving.
Common Mistakes to Avoid
- Using cold cream cheese: Make sure it’s softened to blend smoothly with the yogurt.
- Overmixing the yogurt mixture: This can lead to a dense texture; mix just until smooth.
- Skipping the chilling time: Allowing the jars to chill is crucial for the flavors to meld and the texture to set.
- Not layering properly: Ensure even layers for a beautiful presentation and balanced flavor in every bite.
FAQs about No Bake Greek Yogurt Cheesecake Jars
Can I make this ahead of time?
Absolutely! These No Bake Greek Yogurt Cheesecake Jars can be made a day in advance. Just prepare them, chill in the refrigerator, and they’ll be ready to serve when you are. This makes them perfect for busy weeknights or last-minute gatherings!
How long do these jars last in the fridge?
Stored properly, your No Bake Greek Yogurt Cheesecake Jars will last in the refrigerator for up to 3 days. Just make sure to keep them covered to maintain freshness and prevent any unwanted odors from other foods.
Can I use flavored Greek yogurt?
Yes, using flavored Greek yogurt can add a fun twist to your cheesecake jars! Just keep in mind that it may alter the sweetness level, so adjust the honey or maple syrup accordingly. Flavors like vanilla or berry can complement the dessert beautifully.
Is this recipe suitable for kids?
Definitely! This recipe is family-friendly and perfect for kids. The fun presentation in jars makes it appealing, and the creamy texture is a hit with little ones. Plus, you can let them help with layering the ingredients!
What can I use instead of graham crackers?
If you don’t have graham crackers on hand, you can use crushed cookies like digestive biscuits or even nuts for a gluten-free option. Just make sure to mix them with melted butter to create a similar crust texture!
Recipe Card for No Bake Greek Yogurt Cheesecake Jars
| Prep Time | 20 minutes |
|---|---|
| Cook Time | 0 minutes |
| Total Time | 2 hours 20 minutes |
| Servings | 4 servings |
| Calories | 250 per jar |
Ingredients
- 2 cups Greek yogurt
- 1 cup cream cheese, softened
- 1/2 cup honey or maple syrup
- 1 teaspoon vanilla extract
- 1 cup graham cracker crumbs
- 1/4 cup melted butter
- Fresh fruit for topping (optional)
Instructions
- In a mixing bowl, combine Greek yogurt, cream cheese, honey, and vanilla extract until smooth.
- In another bowl, mix graham cracker crumbs with melted butter until well combined.
- In jars or cups, layer the graham cracker mixture followed by the yogurt mixture.
- Repeat the layers until the jars are filled.
- Top with fresh fruit if desired.
- Refrigerate for at least 2 hours before serving.
Notes
- For a gluten-free version, use gluten-free graham crackers.
- Feel free to customize the toppings with your favorite fruits or nuts.
- This dessert can be made a day in advance for convenience.
Enjoying No Bake Greek Yogurt Cheesecake Jars
These No Bake Greek Yogurt Cheesecake Jars are not just a dessert; they’re a delightful experience that brings joy to any table. The creamy texture and refreshing flavors make them a perfect treat for any occasion, whether it’s a family dinner or a gathering with friends. I hope you enjoy making and sharing these jars as much as I do! If you try this recipe, please leave a review or comment below. I’d love to hear how your cheesecake jars turned out and any creative twists you added!
Print
No Bake Greek Yogurt Cheesecake Jars for Easy Desserts!
- Prep Time: 20 minutes
- Cook Time: 0 minutes
- Total Time: 2 hours 20 minutes
- Yield: 4 servings 1x
- Category: Dessert
- Method: No Bake
- Cuisine: Greek
- Diet: Vegetarian
Description
A delicious and easy dessert made with Greek yogurt, perfect for any occasion.
Ingredients
- 2 cups Greek yogurt
- 1 cup cream cheese, softened
- 1/2 cup honey or maple syrup
- 1 teaspoon vanilla extract
- 1 cup graham cracker crumbs
- 1/4 cup melted butter
- Fresh fruit for topping (optional)
Instructions
- In a mixing bowl, combine Greek yogurt, cream cheese, honey, and vanilla extract until smooth.
- In another bowl, mix graham cracker crumbs with melted butter until well combined.
- In jars or cups, layer the graham cracker mixture followed by the yogurt mixture.
- Repeat the layers until the jars are filled.
- Top with fresh fruit if desired.
- Refrigerate for at least 2 hours before serving.
Notes
- For a gluten-free version, use gluten-free graham crackers.
- Feel free to customize the toppings with your favorite fruits or nuts.
- This dessert can be made a day in advance for convenience.
Nutrition
- Serving Size: 1 jar
- Calories: 250
- Sugar: 15g
- Sodium: 150mg
- Fat: 10g
- Saturated Fat: 5g
- Unsaturated Fat: 3g
- Trans Fat: 0g
- Carbohydrates: 30g
- Fiber: 1g
- Protein: 8g
- Cholesterol: 30mg
Keywords: No Bake Greek Yogurt Cheesecake Jars, easy dessert, Greek yogurt dessert