
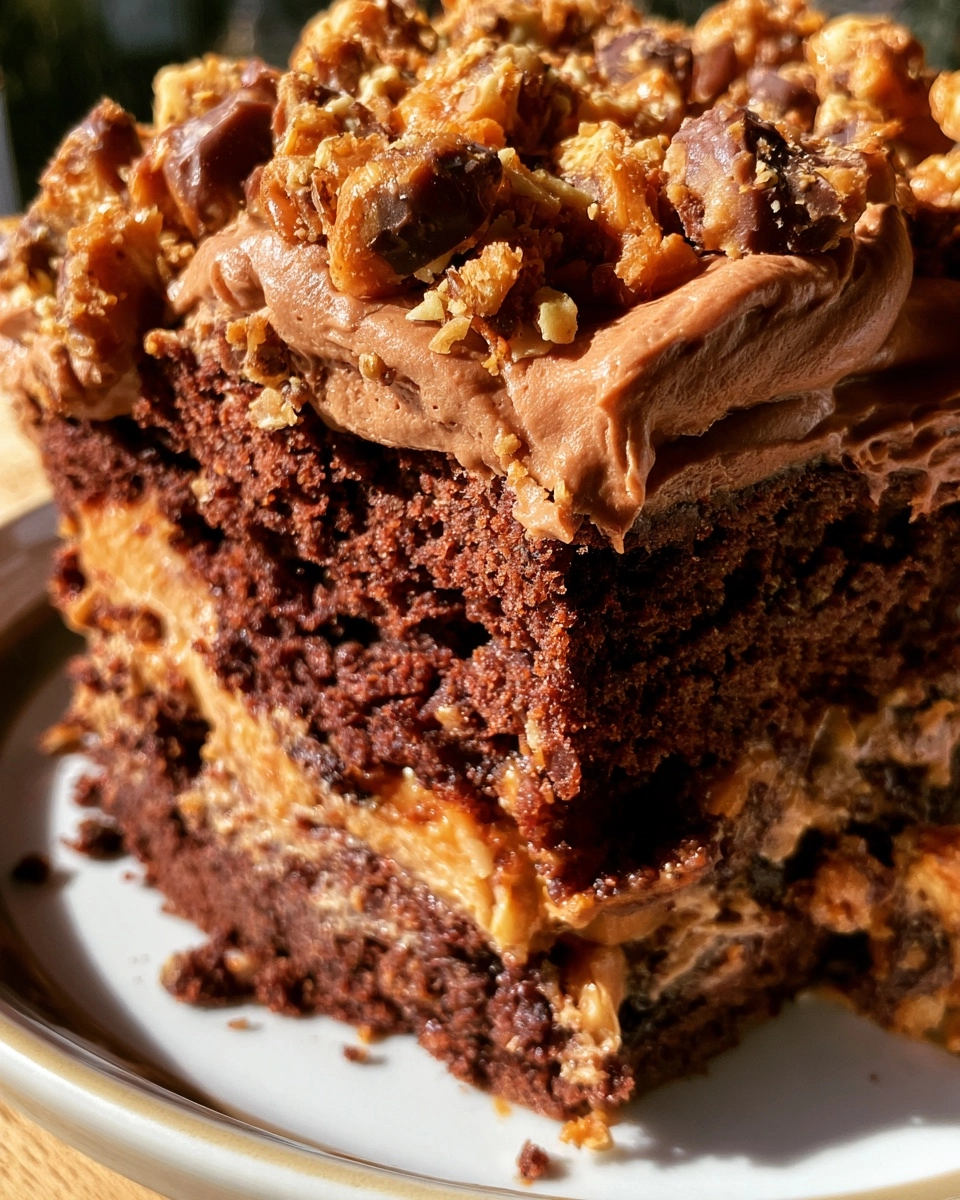
Butterfinger Poke Cake
Are you ready to indulge in a dessert that feels like a warm hug? This Butterfinger Poke Cake is the perfect solution for busy days when you want to impress your loved ones without spending hours in the kitchen. Imagine a rich chocolate cake soaked in creamy peanut butter and topped with crunchy Butterfinger candy—pure bliss! Whether it’s a birthday party, a family gathering, or just a sweet treat for the week, this cake is sure to delight. With its luscious texture and delightful flavors, it’s easy to make and even easier to love!
Why You’ll Love This Butterfinger Poke Cake
This Butterfinger Poke Cake is a dream come true for busy moms and professionals alike. It’s easy to make, requiring just a few simple steps that even novice bakers can master. The combination of rich chocolate and creamy peanut butter creates a flavor explosion that will have everyone coming back for seconds. Plus, it’s family-friendly, making it a hit with kids and adults. Best of all, it’s make-ahead friendly, so you can prepare it in advance and enjoy stress-free entertaining!
Easy to Make
With straightforward steps and minimal fuss, this cake is perfect for anyone, regardless of baking experience.
Delicious Flavor
The rich chocolate cake paired with creamy peanut butter and crunchy Butterfinger creates a mouthwatering treat.
Family-Friendly
Kids and adults alike will love this dessert, making it ideal for family gatherings or parties.
Make-Ahead Friendly
Prepare this cake in advance, allowing the flavors to meld and making your life easier on busy days.
Ingredients for Butterfinger Poke Cake
Main Ingredients
- Chocolate cake mix: The base of our cake, providing a rich and moist texture.
- Water: Helps to hydrate the cake mix for the perfect consistency.
- Vegetable oil: Adds moisture and richness to the cake.
- Large eggs: Essential for binding the ingredients and giving the cake structure.
- Sweetened condensed milk: This creamy ingredient soaks into the cake, adding sweetness and a luscious texture.
- Creamy peanut butter: The star of the show, bringing a nutty flavor that pairs beautifully with chocolate.
- Whipped topping: Light and fluffy, it adds a delightful finish to the cake.
- Crushed Butterfinger candy bars: For that signature crunch and sweet, buttery flavor.
Optional Add-Ins
- Dark chocolate cake mix: For a richer chocolate flavor.
- Chopped nuts: Add some crunch with chopped peanuts or walnuts.
- Chocolate syrup: Drizzle on top for extra chocolatey goodness.
- Extra crushed Butterfinger: Sprinkle more on top for an added crunch.
Ingredient Notes
- Substitutions: You can use almond milk or oat milk instead of water for a dairy-free option.
- Recommended brands: I love using Duncan Hines or Betty Crocker for cake mixes; they never disappoint!
- Fresh vs frozen: Fresh ingredients yield the best flavor, but frozen whipped topping works just as well.
Kitchen Equipment
- 9×13 inch baking dish: A standard size for this cake; you can also use a glass dish.
- Mixing bowls: Essential for combining ingredients; any size will do.
- Wooden spoon: Perfect for poking holes in the cake; a fork works too.
- Measuring cups and spoons: For accurate ingredient measurements.
- Whisk: Great for mixing the peanut butter and condensed milk smoothly.
How to Make Butterfinger Poke Cake
Step 1: Prepare the Ingredients
Start by gathering all your ingredients. Preheat your oven to 350°F (175°C). This is the perfect temperature for baking a moist cake. Grease your 9×13 inch baking dish with a little butter or cooking spray to prevent sticking. Measure out the water, vegetable oil, and eggs as per the cake mix instructions. Having everything ready makes the process smoother!
Step 2: Mix or Assemble
In a large mixing bowl, combine the chocolate cake mix, water, vegetable oil, and eggs. Use a whisk or an electric mixer to blend everything until smooth. Make sure there are no lumps! Once mixed, pour the batter into your prepared baking dish, spreading it evenly. This will ensure that it bakes uniformly.
Step 3: Cook or Bake
Place the baking dish in the preheated oven and bake for 30-35 minutes. You’ll know the cake is done when a toothpick inserted in the center comes out clean. Keep an eye on it during the last few minutes to avoid overbaking. A perfectly baked cake should spring back when lightly touched.
Step 4: Finish and Garnish
Once the cake is baked, remove it from the oven and let it cool for about 10 minutes. Then, using the end of a wooden spoon, poke holes all over the cake. This is where the magic happens! In a separate bowl, mix the sweetened condensed milk and creamy peanut butter until smooth. Pour this mixture over the cake, making sure it seeps into the holes. Let the cake cool completely before spreading the whipped topping over the top. Finally, sprinkle the crushed Butterfinger candy bars generously on top for that delightful crunch!
Step 5: Serve
Refrigerate the cake for at least 2 hours before serving. This allows the flavors to meld beautifully. When you’re ready to serve, cut the cake into squares and enjoy the ooey-gooey goodness. It’s perfect for parties, family gatherings, or just a sweet treat at home. Trust me, everyone will be asking for the recipe!
Expert Tips for Success
- Use Fresh Ingredients: Fresh eggs and quality peanut butter make a noticeable difference in flavor.
- Don’t Overcook: Keep an eye on your cake; overbaking can lead to a dry texture.
- Measure Accurately: Use measuring cups and spoons for precise ingredient amounts to ensure the best results.
- Follow Timing Carefully: Stick to the baking time; every oven is different, so check for doneness a few minutes early.
- Common Pro Tips: Let the cake cool completely before adding toppings for the best presentation.
Recipe Variations for Butterfinger Poke Cake
Healthier Version
- Use a sugar-free chocolate cake mix to cut down on calories.
- Replace sweetened condensed milk with a low-fat version or homemade alternative using almond milk and a sweetener.
- Opt for natural peanut butter without added sugars or oils.
Vegetarian Version
- This recipe is already vegetarian-friendly! Just ensure that the cake mix and whipped topping are free from any animal-derived ingredients.
Gluten-Free Version
- Substitute the chocolate cake mix with a gluten-free cake mix available at most grocery stores.
- Check that the sweetened condensed milk and peanut butter are gluten-free as well.
Spicy Version
- Add a pinch of cayenne pepper or chili powder to the peanut butter mixture for a surprising kick.
- Top with a drizzle of spicy chocolate sauce for an extra layer of flavor.
Extra Indulgent Version
- Use dark chocolate cake mix for a richer chocolate flavor.
- Layer in some chocolate ganache between the cake and whipped topping for a decadent twist.
- Top with additional chocolate shavings or a drizzle of caramel sauce for an indulgent finish.
What to Serve With Butterfinger Poke Cake
Side Dishes
- Fresh fruit salad: A light and refreshing contrast to the rich cake.
- Vanilla ice cream: A classic pairing that complements the chocolate and peanut butter.
Sauces and Toppings
- Chocolate syrup: Drizzle over the top for extra sweetness.
- Caramel sauce: Adds a delightful richness that pairs beautifully with the cake.
Drinks
- Milk: A classic choice that balances the sweetness of the cake.
- Decaf coffee: Perfect for a cozy dessert experience.
Desserts
- Brownies: For those who can’t get enough chocolate!
- Peanut butter cookies: A fun way to keep the peanut butter theme going.
Storage Instructions
Refrigerator
- Store any leftover Butterfinger Poke Cake in an airtight container in the refrigerator.
- It will stay fresh for up to 3 days, but trust me, it’s so delicious, it might not last that long!
Freezer
- If you want to keep it longer, you can freeze the cake. Wrap it tightly in plastic wrap and then in aluminum foil.
- It can be frozen for up to 2 months. Just remember to label it with the date!
Reheating
- To enjoy your cake after freezing, let it thaw in the refrigerator overnight.
- If you want to warm it up, place individual slices in the microwave for about 15-20 seconds.
- Be careful not to overheat, as it can dry out the cake.
Common Mistakes to Avoid
- Not greasing the baking dish: This can lead to the cake sticking and breaking apart when you try to serve it.
- Poking holes too soon: Allow the cake to cool for at least 10 minutes before poking holes to prevent it from falling apart.
- Skipping the refrigeration step: Refrigerating the cake allows the flavors to meld and the texture to set, enhancing the overall taste.
- Using cold ingredients: Make sure your eggs and peanut butter are at room temperature for better mixing and a fluffier cake.
FAQs about Butterfinger Poke Cake
Can I make this ahead of time?
Absolutely! This Butterfinger Poke Cake is perfect for making ahead. You can prepare it a day in advance and let it chill in the refrigerator. This allows the flavors to meld beautifully, making it even more delicious when you serve it!
Can I use a different cake flavor?
Yes! While chocolate is a classic choice, you can experiment with other flavors like vanilla or even red velvet. Just keep in mind that the peanut butter and Butterfinger flavors will still shine through, no matter the cake base.
How do I store leftovers?
Store any leftover Butterfinger Poke Cake in an airtight container in the refrigerator for up to 3 days. If you want to keep it longer, you can freeze it for up to 2 months. Just remember to wrap it tightly!
Can I make this gluten-free?
Definitely! Simply substitute the chocolate cake mix with a gluten-free version available at most grocery stores. Just ensure that all other ingredients, like the sweetened condensed milk and peanut butter, are also gluten-free.
What can I use instead of whipped topping?
If you prefer a homemade touch, you can whip up some heavy cream with a bit of sugar and vanilla extract to create your own whipped topping. It adds a lovely freshness to the cake!
Recipe Card for Butterfinger Poke Cake
| Prep Time | 20 minutes |
|---|---|
| Cook Time | 35 minutes |
| Total Time | 2 hours 55 minutes |
| Servings | 12 servings |
| Calories | 350 per slice |
Ingredients
- 1 box chocolate cake mix
- 1 cup water
- 1/2 cup vegetable oil
- 3 large eggs
- 1 can sweetened condensed milk
- 1 cup creamy peanut butter
- 1 tub whipped topping
- 1 cup crushed Butterfinger candy bars
Instructions
- Preheat the oven to 350°F (175°C).
- Prepare the chocolate cake mix according to package instructions using water, vegetable oil, and eggs.
- Pour the batter into a greased 9×13 inch baking dish and bake for 30-35 minutes.
- Once baked, remove the cake from the oven and let it cool for 10 minutes.
- Using the end of a wooden spoon, poke holes all over the cake.
- In a bowl, mix the sweetened condensed milk and peanut butter until smooth.
- Pour the peanut butter mixture over the cake, ensuring it fills the holes.
- Let the cake cool completely, then spread whipped topping over the top.
- Sprinkle crushed Butterfinger candy bars on top of the whipped topping.
- Refrigerate for at least 2 hours before serving.
Notes
- For a richer flavor, use dark chocolate cake mix.
- Store leftovers in the refrigerator for up to 3 days.
- Feel free to add more crushed Butterfinger on top for extra crunch.
Indulge in This Butterfinger Poke Cake
This Butterfinger Poke Cake is more than just a dessert; it’s a celebration of flavors that brings joy to any occasion. The combination of rich chocolate, creamy peanut butter, and crunchy Butterfinger creates a delightful experience that will have everyone smiling. Whether you’re serving it at a family gathering or enjoying a quiet evening at home, this cake is sure to impress. I’d love to hear how your Butterfinger Poke Cake turns out! Please leave a review or comment below, and share your thoughts or any fun variations you tried. Happy baking!
Print
Butterfinger Poke Cake: Indulge in This Decadent Delight!
- Prep Time: 20 minutes
- Cook Time: 35 minutes
- Total Time: 2 hours 55 minutes
- Yield: 12 servings 1x
- Category: Dessert
- Method: Baking
- Cuisine: American
- Diet: Vegetarian
Description
A rich and indulgent Butterfinger Poke Cake that combines chocolate cake with creamy peanut butter and crunchy Butterfinger candy.
Ingredients
- 1 box chocolate cake mix
- 1 cup water
- 1/2 cup vegetable oil
- 3 large eggs
- 1 can sweetened condensed milk
- 1 cup creamy peanut butter
- 1 tub whipped topping
- 1 cup crushed Butterfinger candy bars
Instructions
- Preheat the oven to 350°F (175°C).
- Prepare the chocolate cake mix according to package instructions using water, vegetable oil, and eggs.
- Pour the batter into a greased 9×13 inch baking dish and bake for 30-35 minutes.
- Once baked, remove the cake from the oven and let it cool for 10 minutes.
- Using the end of a wooden spoon, poke holes all over the cake.
- In a bowl, mix the sweetened condensed milk and peanut butter until smooth.
- Pour the peanut butter mixture over the cake, ensuring it fills the holes.
- Let the cake cool completely, then spread whipped topping over the top.
- Sprinkle crushed Butterfinger candy bars on top of the whipped topping.
- Refrigerate for at least 2 hours before serving.
Notes
- For a richer flavor, use dark chocolate cake mix.
- Store leftovers in the refrigerator for up to 3 days.
- Feel free to add more crushed Butterfinger on top for extra crunch.
Nutrition
- Serving Size: 1 slice
- Calories: 350
- Sugar: 28g
- Sodium: 200mg
- Fat: 18g
- Saturated Fat: 7g
- Unsaturated Fat: 9g
- Trans Fat: 0g
- Carbohydrates: 42g
- Fiber: 1g
- Protein: 6g
- Cholesterol: 50mg
Keywords: Butterfinger Poke Cake, chocolate cake, dessert, peanut butter, easy cake recipe